


Adding a New User
This process enables you to create and maintain the different types of users in your uStore environment.
 The list of fields displayed in the User
Setup page is defined in Presets
> User Details Setup. For more information, see Setting Up User
Details Fields.
The list of fields displayed in the User
Setup page is defined in Presets
> User Details Setup. For more information, see Setting Up User
Details Fields.
To create a user:
1. Hover over
the Users  view and select Create
New User.
view and select Create
New User.
The User
Setup page is displayed. View
image

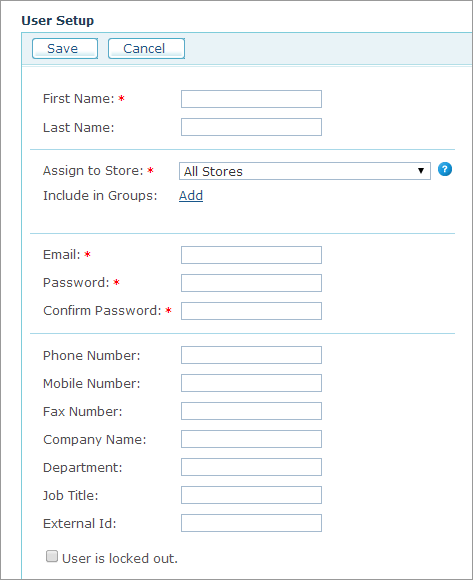
2. Configure the following user properties:
● First Name: user’s first name.
● Last Name: user’s last name.
● Assign to Store: Determines if the user credentials are valid for all allowed stores or for a specific store only. In the latter case, uStore allows you to have several users with the same email address assigned to different stores. When you assign the user to all stores, uStore allows only one user with the same email address. User assignment to a store does not override the permissions setup in the User Group.
● Include in Groups: Lists all User Groups defined for this user in the uStore system. By selecting the desired User Group, you can determine which stores this user will be able to access. To start using uStore, a user must be part of at least one User Group. To add a user to one or more User Groups, click the Add link, and in the Add to Group window select the User Group to which you want to add the user.
● Email: Serves as this user’s user name when logging in to uStore Back Office or uStore Storefront.
● Password: Serves as this user’s password when logging in to uStore. The password format must match the password format settings defined in the Permissions tab of the Store Setup page (see Password Policy). Note that it is automatically concealed by ten characters, regardless of its actual length.
● Confirm Password: Re-enter the password that you entered in the Password field.
● You can optionally enter the following fields: Phone Number, Mobile Number, Fax Number, Company Name, Department, Job Title.
● External ID: Enables you to distinguish a user with an identification number. This is useful when creating custom made plug-ins for your store.
● User is locked out: This checkbox is available for locking out a user. The lockout may happen automatically if the password policy of the store to which the user registered is set to lock out users after a certain number of invalid login attempts. Once the user is locked out, this checkbox is automatically checked and the "User is locked out" message appears in red. The Store administrator can unlock the user’s account by clearing this checkbox.
3. Click Save.
See Also
Watch this video to learn
more about assigning users to stores ![]()