


Creating Products: Overview
Prerequisites
● Before you add a Dynamic Document type of product to your online store, it must first be produced by the uProduce Server. For each document, you must perform at least one proof job and one process (production) job, each consisting of at least one record. If you add an Email type of product to your online store, it must first be tested and sent by the uProduce Server. Note that the proof settings and production settings you specify at this stage will be used whenever the product is proofed or produced via uStore.
For detailed instructions, please refer to the uProduce User Guide.
● Make sure you logged on to uProduce using the same user name that you entered in the Store Setup page.
To add products to a particular Product Group:
 Some product definitions are inherited by default from the store
setup (for example, the Proof Type).
However, the definitions may be overridden per-product.
Some product definitions are inherited by default from the store
setup (for example, the Proof Type).
However, the definitions may be overridden per-product.
1. In the Store Details page, go to the store's group list and select the group to which you want to add a product.
2. In the Product Group area, hover over the New button and from the displayed menu select the type of product you want to add (see Product Types).
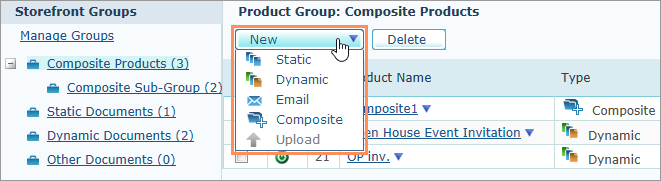
For Storefront Groups you can
select Static, Dynamic,
Email or Composite
products. For Component Groups you can
select Static, Dynamic or
Upload products. These products can
be part of a Composite product.
The Product Setup page is displayed.
3. Specify the desired product definitions, as described in following sections:
● General - General information about the product, such as product name and catalog number.
● Product Information in Storefront - Product details that will be displayed in the Storefront, such as description and keywords.
● Documents - Document details, that vary according to the document type.
● Cross Media - Define a personalized URL for each recipient.
● Proof - Enable customers to proof the product before purchasing and define proof settings.
● Product Groups - Select the product groups in which the product will be included.
● Pricing & Tax - Enable product pricing and select tax group.
● Advanced Parameters - Additional parameters, such as product manufacturer and search engine optimization.
4. Click Save.
The new product is added to the Products
Group.
The main Product Setup page is displayed. The main Product Setup page enables you to customize the product and set up its pricing and delivery options.
Note that the Save button is disabled when editing the online product. You should take the product offline before saving any changes made in the Edit Product page.
Product setup definitions vary depending on the product type:
● Dynamic Document: you are required to select the relevant Account, Campaign, Document to be loaded from the uProduce Server, and you may edit the Proof Job ID, the Process Job ID and the Thumbnail Image fields.
● Static Document: you are required to specify the location of the Document File, Proof File and Thumbnail Image.
● Email Document: you are required to select the relevant Account, Campaign and Email Document to be loaded from the uProduce Server. You can also select the Schedule Order Automatically checkbox to send the Email Document directly to the Scheduled Emails queue.
● Composite Product: you are required to specify a Thumbnail Image and to select an Account, Campaign, Document of a Preview Template. The Preview Template should include all the available properties that you want to show of the components of the Composite Product as described in Creating a Preview Campaign. You may verify the Proof Job ID.
● Upload Product: you are required to select an Output Paper Size from a list of preset options and determine whether to enable Product Pricing.
You can select a different document only for products or duplicated
products that have not yet been ordered.
See Also
Setting Up Your Products: Overview