


Viewing Ordered Item Information
1. To view detailed
information of the ordered product, click the Orders
view, and in the Order List page
click the link in the Order ID column.
The Order
Details page is displayed.
2. Click the Details link
of the required item.
The Item
Details page opens, providing a detailed report of an ordered item.
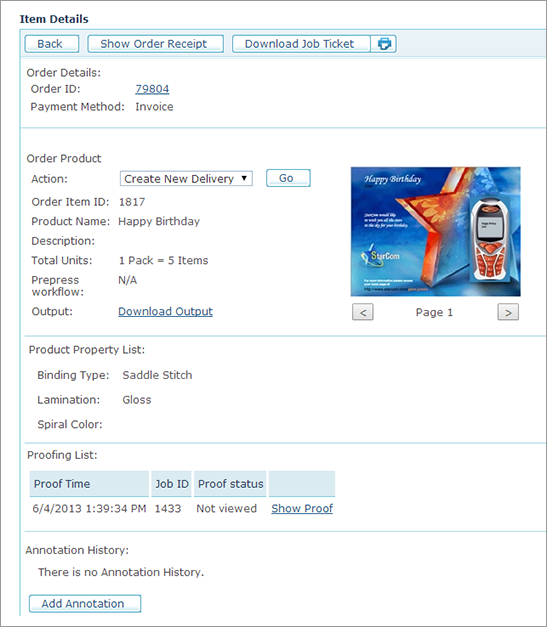
This page displays the following order information:
● Order ID: The unique identifier of the order in which this item is included. You can instantly find a specific order by searching for its exact Order ID.
● Payment Method: Indicates the payment method chosen by the customer: Invoice or Credit Card.
● Action: Enables you to change the order queue. For information on available order queues, refer to Managing Print Product Orders.
● Order Item ID: Each Order ID may contain multiple items (i.e., ordered products). Therefore, each instance of the ordered product receives a unique identifier.
● Product Name: Name of the product.
● Description: Detailed description of the product.
● Total Units: Number of ordered units. "Units" can refer to single units or packs.
● Prepress workflow: Displays the prepress workflow setup selected for the ordered item as follows:
● [WorkflowName]: The name of a prepress workflow appears when a prepress workflow was defined for the item.
● Not selected: When prepress workflow was set up for the item, but a default workflow was not selected.
● N/A: When the prepress workflow was not set up for the item.
 When you open this page from the Ready
for Prepress queue, the Select
Workflow link is displayed enabling you to select a new prepress
workflow or change the default selection.
When you open this page from the Ready
for Prepress queue, the Select
Workflow link is displayed enabling you to select a new prepress
workflow or change the default selection.
● Output: Click to download the output (PDF) file from uProduce.
● Product Property List: Displays the product properties that were defined for the ordered product and their values (i.e., customer selections).
● Composite Components List (Composite Products only): Displays a list of all the components of the Composite Product and its properties.
When you view this page in the Ready
for Prepress queue, you can click the Prepress Workflow link to
select a new prepress workflow or change the selected workflow.
● Proofing List: Provides information about the Product Proof (Proof time, Job ID and Proof status). Clicking the Show Proof link displays the document image in a separate window. The Show Proof link is not available for composite products
● Add Annotation: You can add an annotation to the any order, product or product queue transition. uStore saves a history of all annotations, allowing you to keep track of this information.
uStore also enables you to take advantage of the annotation capability to obtain valuable information on noteworthy product queue transitions. For example, this may include the transition from the Pending queue to Cancelled queue. You can do this by defining such annotations as mandatory for performing the queue transition. These mandatory queue transition annotations are defined in the Order Handling Action Table, which is included in the Presets view’s System Setup tool. See System Setup: Customizing uStore Tables.
● Show Order Receipt: View the customer’s receipt by clicking Show Order Receipt button at the top of the page.
● Download Job Ticket:
Download the Order Job Ticket as a Word document (Job
ticket - item ID-<Order Item ID>.doc). This document contains
a General Comments field where
you can add your comments.
To customize the Job Ticket template, go to Presets
> System Setup > Message Template and edit the Create Printed Job ticket on new Order Creation
template (see Setting
Up the Message Template Table).
● Print: Print the Order’s Job Ticket in order to attach it to the Order. To customize the Job Ticket template, go to Presets > System Setup > Message Template and edit the Create Printed Job ticket on new Order Creation template (Setting Up the Message Template Table).
The information in the downloaded or printed Job Ticket document
represents the Job status at the time of download/print operation. For
example, the Order Status may change during the job processing.
Superusers can differentiate between store administrators by presenting filtered queues and/or action menus in the Orders page to support the business workflow. This is done by setting the corresponding User Group permissions: See All Order Queues and See All Order Actions. For more information, refer to Assigning Permissions to the User Group.
In addition, Superusers can prevent Back Office users from performing actions that exceed their area of responsibility by simply removing the relevant action/queue menu items. Similarly, the superuser can add actions and/or queues to the default workflow and assign them to different store operators. For more information on adding or removing queues and actions, see Setting Up the Order Handling Status Table and Setting Up the Order Handling Action Table.
See Also
Watch this video to learn
more about printing and downloading a job ticket ![]()