


Print Queues
Following is a detailed explanation of the print queues:
This queue lists the orders that are still pending approval by the clearing service. After the payment is cleared, the order automatically moves to the Pending Prints queue for processing. Administrators can approve or reject orders manually. Just like with other e-commerce experiences, orders that use delayed clearing methods are confirmed and an order confirmation message is sent to the customer (if it was previously configured).
 This feature is only available for clearing services supporting
delayed payments, such as MultiSafepay.
This feature is only available for clearing services supporting
delayed payments, such as MultiSafepay.
This queue includes the following types of ordered items:
● Items that have been received from the uStore Storefront application and have not been processed yet via the uStore Back Office application.
● Items that were moved back to the beginning of the processing cycle from the Ready to Produce, Ready for Prepress, Cancelled or Failed Jobs queues.
To add a pending item to the list of items intended for processing, go to the Action list and choose Prepare. You can also choose Cancel to abort the production process of the item.
● Pending Recipient List - Prints

This queue is relevant for documents whose recipient list has been ordered using USAData services (see Allowing Customers to Use USAData Services). The order items reside in this queue until their recipient lists are ready and retrieved from USAData.
This optional queue enables you to select items that share the same document and product properties selections and group them into a single cluster (see Setting Up Global Product Properties and Setting Up Product Properties for Single Products). You can benefit from aggregating items for production by:
● Sorting your recipient lists and thus reducing mailing costs.
● Making the production process more efficient by providing stacked print jobs to the printing press.
Aggregating items is possible when all of the following conditions are met:
● The items are in the Pending queue.
● The items are based on the same document (for example, have the same design).
● The items share the same property (or properties). Documents may be assigned several properties that affect aggregation (as described in Setting Up Global Product Properties and Setting Up Product Properties for Single Products). The properties and the value selected for each property should be identical in all documents that are intended for aggregation. Note, the algorithm that verifies aggregation is case sensitive; for example, ‘Paper Type’ is not equal to ‘paper type’.
If you plan to group a
number of products in a store, you should create Global Pricing Properties
(as in Setting
Up Global Product Properties) for those products to avoid
product mismatching properties.
To aggregate items in the Pending queue:
1. From
the Group
By list, select Aggregation
ability.
The view will now show the items grouped by their document and product
properties.
2. Select items that share the same aggregation possibilities (i.e., items under the same group).
3. Select Aggregate from the Action list at the top of the page.
4. Click Go.
The items you selected will move to the Aggregating queue under a new aggregation group, as shown in the following figure. You can group several corresponding Print product items into one group.
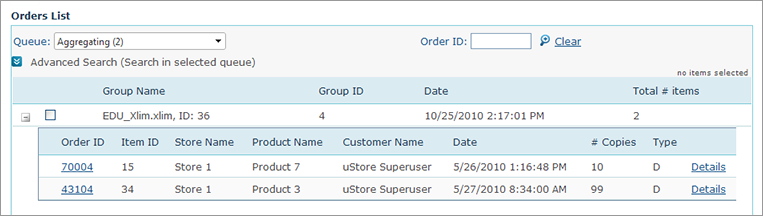
Grouped items are automatically added to the list of items intended for processing immediately after their recipient lists were merged (i.e., the Ready to Produce queue).
Serves as a queue for items intended for processing. In this queue, you can select the following actions:
● Process (1 Copy): Sends dynamic documents to the uProduce server for processing or opens static documents for printing.
● Process (all copies): Sends dynamic documents to the uProduce server for processing or opens static documents for printing, but when you select this queue, the output job consists of multiplications of the content of the source document per number of copies. For example, 100 copies of a single-page document will result in a 100-page document.
For aggregated print jobs,
you can only choose the Process (all copies) action.
For Composite and Static documents, you can only choose the Process (1 copy) action.
● Revert: This action sends selected items back to the Pending queue. Note that when you revert grouped items (aggregated items), the group of items is broken apart and each of the ordered products is sent back to the Pending queue.
Moving an item to the Ready to Produce queue
does not imply that the document is actually going to be produced.
The purpose of this queue is to enable the administrator to “narrow
down” the processing candidates by filtering out items not relevant
to the current processing task.
Includes items that are in the process of being produced.
Successfully produced items are automatically sent to the next queue based on the following conditions:
● If a prepress workflow is associated with the product, it goes to the Ready for Prepress queue.
● If no prepress workflow is associated with the product, it goes to the Ready for Delivery queue.
Items whose jobs failed or were deleted are sent automatically to the Failed Jobs queue and a notification email is sent to the Superuser. The email shows the OrderID, OrderProductID, error messages from uProduce and a link to the Order Product Details page (shown in Viewing Ordered Items Information). In the Order Product Details page, the user can move the item to the Pending queue and retry the processing.
The link to the Order Product Details page
is displayed only if a friendly URL has been configured for the store
in the Store
Setup page > General tab >
Enable
Store Friendly-URL checkbox (see Enabling Store-Friendly
URL).
You can also send items manually to the Ready for Delivery queue by selecting Prepare for Delivery from the Action list.
Includes items that were associated with a prepress workflow. From this queue, you can select the following actions:
● Run: Sends the item to its prepress workflow. Only items that are associated with a prepress workflow can be run.
 If the selected item
is a Composite product that is made up of components whose workflows
were not merged to one Prepress Setup, then each component will run
according to its own workflow. If you want all the Composite
components to run using the same workflow, in the Orders
List, in the item row, select View
list, and change each component’s workflow
If the selected item
is a Composite product that is made up of components whose workflows
were not merged to one Prepress Setup, then each component will run
according to its own workflow. If you want all the Composite
components to run using the same workflow, in the Orders
List, in the item row, select View
list, and change each component’s workflow
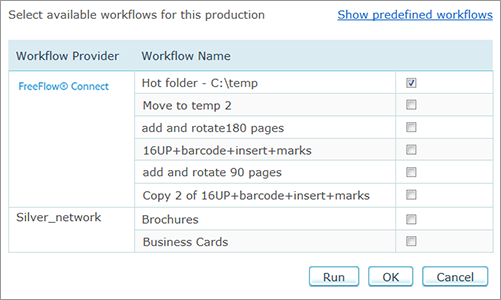
● Select Workflow: Enables you to change the workflow defined for an item. When you select this action, a dialog box with the workflows that were defined for this item is displayed. You can select a different workflow and run the job.
§ To see more workflows, click the Show all workflows link.
§ To toggle back to the list of predefined workflows, click Show predefined workflows.
For aggregated print jobs,
you can select the workflow directly in the Orders
List page, in the Workflow name column. All aggregated
print jobs run using the same workflow.
● Prepare for Delivery: Skips the prepress stage and moves the item to Ready for Delivery queue.
Includes items that are in the prepress stage. Items will automatically move to the next queue when a complete notification is received from the prepress workflow provider. Items that fail or items that wait in this queue for longer than one hour are automatically moved to the Failed Jobs queue.
If the Auto-run
to prepress production option was selected during the
product’s Prepress Setup, then the
print job will run directly from the Producing
File in Progress queue to the Prepress
in Progress queue.
Indicates that a product is ready to be delivered. Until the order reaches this queue, it is managed per Product item, that is for each Item ID there will be a different record in the Orders list. However, from the moment the order reaches the Ready for Delivery queue, it is managed per Shipping item. This is important for orders with split shipping where the same product is shipped to different addresses. In this case, the Orders List can display two records with the same Order ID and Item ID but with different shipping parameters.
In the All Queues list,
the orders are displayed as they appear in the Ready
for Delivery queue, that is by Shipping item.
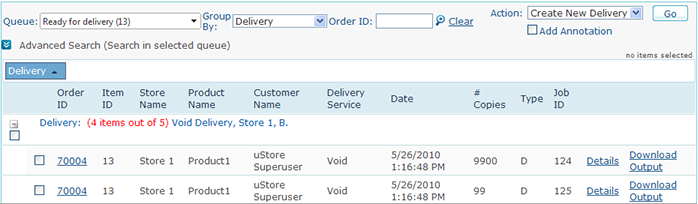
When viewing the Ready for Delivery queue, you can group the Shipping items list by the their Delivery Ability. This way you can cluster Shipping items by their delivery provider and addressee, provided that all Shipping items are from the same store.
Select the Shipping items you want to deliver and then select Create New Delivery from the Actions list and click Go.
The pop up window that is displayed contains options for delivery depending on the delivery provider.
For Manual shipping, the following pop up window is displayed:
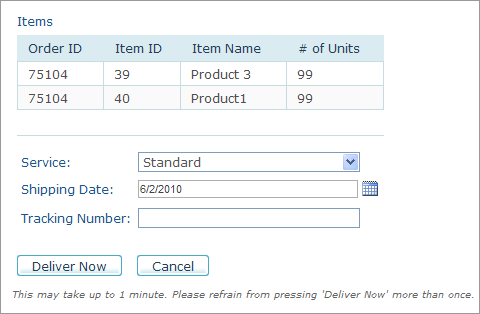
The selected service in the Service list is the service the customer chose in the order. You may change it by selecting a different service. Enter a Shipping Date, a Tracking Number (if required) and click Delivery Now.
For FedEx shipping, the following pop up window is displayed:
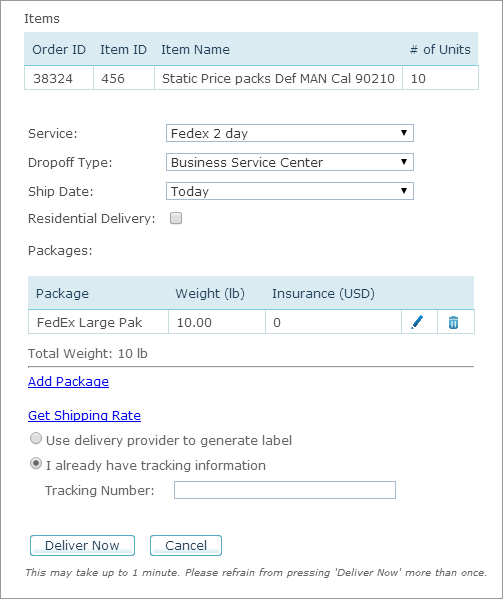
Fill in the following information:
|
Field |
Description |
|
Service |
The selected service is the service the customer chose in the order; you may change it to a different service. |
|
Drop Off Type |
Drop off type. |
|
Ship Date |
Shipment schedule. |
|
Residential Delivery |
Selected by default if the customer address is a residence. |
|
Packages |
● Package: Estimation of the most suitable package for this shipment. Change it if you are about to ship the order in a different package. ● Weight: Weight of the package. ● Insurance: (Optional) Enter the insurance premium for the shipment. The initial price is the total price of the order. ● Total Weight: Estimation of the total weight of the package. ● Add Package: (Optional) Click this link to add more packages. A new row is displayed in the Packages section, where you can enter the new package details. |
|
Get Shipping Rate |
Click to get shipping rate from FedEx. |
|
Use delivery provider to generate label |
Select this option to automatically receive the label from FedEx. |
|
I already have tracking information |
Select this option to manually enter the Tracking Number you have already received from FedEx. |
|
Deliver Now |
If you chose FedEx as your delivery provider, click to instruct FedEx to deliver the product. The product order will move to the Delivering queue. |
For UPS shipping, the following pop up window is displayed:
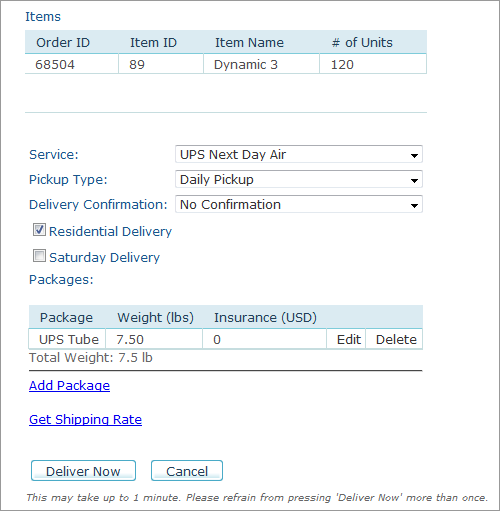
Fill in the following information:
|
Field |
Description |
|
Service |
The selected service is the service the customer chose in the order; you may change it to a different service. |
|
Pickup Type |
Type of pickup (for example, Daily Pickup). |
|
Delivery Confirmation |
Select if delivery confirmation is required. |
|
Residential Delivery |
Selected by default if the customer address is a residence. |
|
Saturday Delivery |
Select this checkbox if you wish the package to be delivered on Saturday. This delivery type is normally used for time-critical shipments. |
|
Packages |
Estimation of the most suitable package for this shipment. Change it if you are about to ship the order in a different package. |
|
Add Package |
(Optional) Click this link to add more packages. A new row is displayed in the Packages section, where you can enter the new package details. |
|
Get Shipping Rate |
Click to get a shipping rate from UPS. |
|
Deliver Now |
If you chose UPS as your delivery provider, click to instruct UPS to deliver the product. The product order will move to the Delivering queue. |
Indicates the fulfillment stage of the delivery.
● If you chose an online carrier service, such as FedEx or UPS, a fulfillment request is sent to the respective carrier. When the product is delivered, the product order will move automatically to the Delivered queue. You can also move the order manually to the Delivered queue by selecting the product from the list, select Deliver from the Actions menu and then click Go.
● If you chose Manual Mailing or Manual Shipping, you are required to manually move the product order to the Delivered queue. To do this, select the product from the list, select Deliver from the Actions menu and then click Go.
The product list in the Delivering queue is clustered by the delivery service, store and address.
Indicates a product has been delivered. Note that when using FedEx, this transition is automatic based on delivery confirmation that is submitted by FedEx.
● Archive
Lists archived items. Archived items are items that has been prepared and delivered to customers. To archive an item, select Archive from the Actions menu and then click Go.
Add your comments here: